
Published on November 27, 2017
Share The Post


If your company has a salesforce, and you sell SaaS deals of a decent size, there’s a pretty near certainty your company has a gong. Ring in the deals…GONG. OK, it’s a little stupid but also fun. And as our company, Beeswax, started to really scale, inevitably a gong showed up on the sales floor.
But Beeswax is a tech company first, and the manual, and frankly unscalable, nature of gong ringing really didn’t sit well with me. If only we had a robot who could ring the gong for us…
So I built the Robo-Gong™, an Arduino-powered robot built for about $100. Here’s a video of it in action, and then a step-by-step tutorial for creating your own.
What You’ll Need
At a minimum you’ll need the following (all links to Tinkersphere, an awesome shop in NYC’s East Village):
- A platform of some kind, preferably wood
- A 5V to Micro-USB DC power charger
- An Arduino Yun
- A servo motor, preferably a heavier one made of metal
- Some kind of servo platform for raising it above the platform (I used this one, but there are probably better options)
- (optional) extra jumper wires
Step 1: Connect Salesforce to my Gmail Account
We need to Robo-Gong to be activated when a record in Salesforce is won. There are a lot of ways to do this using APIs, etc, but for the sake of simplicity, I just set up Salesforce to send an email whenever a deal’s status was “Won”.
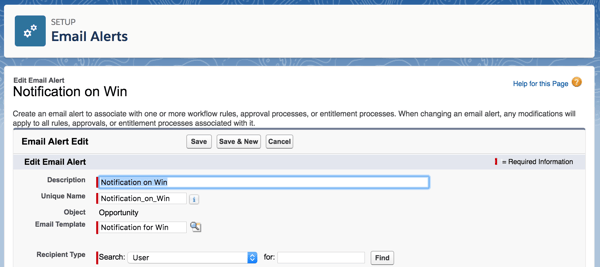
In Salesforce (assuming you have the rights) navigate to Setup->Process Automation->Workflow Actions->Email Alerts then create a notification on win as shown below.
You can then send an email to yourself or to a mailing list.
Then I created a filter in my Gmail to tag all these emails with the category “won” so my robot would have a clear signal of what to look for.
Step 2: Setup Arduino and Connect to Wifi
I bought an Arduino Yun which has built-in wifi, making the wifi connection pretty simple. Follow these instructions, specifically the portions about connecting to wifi. When done you should have the Arduino client downloaded and connected to your board, and your board should be able to connect to the Internet.
Step 3: The Code
I then wrote a pretty simple Arduino program that does the following:
- Use cURL to get the digest of my “Won” folder from Gmail. Gmail offers an Atom-based syndication feed of email titles, which is much easier than using a full email client.
- Save the unread count
- Check the new count against the unread count
- If unread count is higher than previously, activate a servo to ring the Robo-Gong
Don’t trust me on this, I put the code on github.
To make this code work for your project you need to update the Gmail authentication info and the name of the local folder. You can also fiddle with the speed of the servo if you feel like it.
Step 4: Connect the Servo
Personally I found this the most challenging step since the wires kept coming loose, and the servo output has three connected wires whereas the Arduino inputs are on different sides of the board. I found that buying separate jump cords and splicing them was the easiest solution. This tutorial explains how to connect the wires.
Step 5: Connect the Mallet
The least high tech part of the operation and maybe the trickiest. I used a mixture of hanging wire that threaded through the servo’s arm, and then some duct tape to keep it steady.
The Result
The result, as seen in the Beeswax office. Behold, the Beeswax Robo-Gong in all it’s automated splendor!

Back to the Blog
Share The Post